Looking for my photography website? Just click here!!
Showing posts with label craft idea. Show all posts

Monday, November 19, 2012

What not to do when making yarn balls ....

Today is my baby's birthday .. she's a big ol' 11 years old now!  I'm on a roll in getting their room decorated before company comes. 

IMG_6879-001

I saw this idea at a friend's house while doing their newborn shoot.  She said it was so easy, and it looked so amazing!  I thought "ooh! I could do this to Maddie's room!"  So I scoured Pinterest, blogs and figured out what formula I should use.  For example, liquid starch .. elmer's glue ... cornstarch .. and the list goes on.

Here is my list of what not to do when making yarn balls.

1)  First of all .... don't make them.  I'm not kidding.  They may look incredibly easy, but they're not.  Sure yarn is cheap, balloons are cheap, and so is glue.  Do not be swayed!  Stay away from these balls!  Go buy japanese lanterns instead!

2)  If you decide you have to make these yarn balls, then don't use just elmer's glue & water.  I tried this on my last three balls I made, and it did not work.  The first three balls I made (I ran out of mixture), I used a combination of Elmer's glue, cornstarch & water.  I think the ratio is like 4 oz glue, 1/2 c cornstarch and 1/4 c of water.  When I realized that my yarn was not hardening up like the first batch did -- I had to run out to get even MORE glue, and did my mixture and paint it on while it was wrapped around the balloon.  It did the trick, and hardened up after drying.  Also note that you'll use even more glue than you think you will use.   Stock up for this project.

IMG_6872


3)  Two people really need to be doing this -- one to dip the yarn in the mixture and one to wrap it around the balloon.  I read somewhere someone said to place vaseline around the balloon, but I didn't do this.  If I did, maybe it would have prevented a lot of frustration after I popped the balloon.  I'll show you why in a second.... If it doesn't prevent what I'm about to show you, then I have no clue why they put vaseline around the balloons?

4)  Again, don't make these yarn balls.  They are a headache, I'll tell you!  I'm totally doing ya a favor!

IMG_6875


5)  After you pop the balloons -- they will still stick to the yarn, and there will be lots of dried mixture that stays on the yarn.  What a pain in the butt.  I gave up after a few hours of scraping this off with a skewer -- I'm hoping no one take a close look when it's in her room.

IMG_6877

IMG_6873

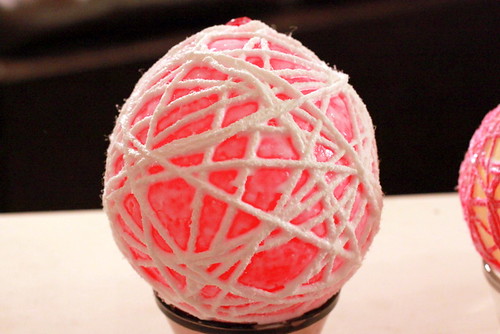
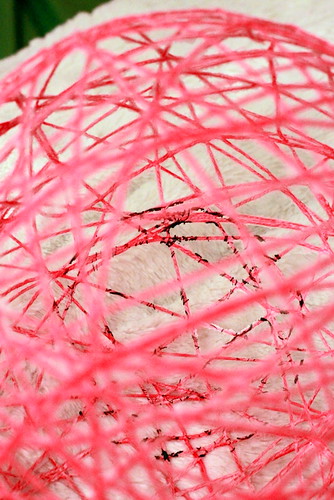
6)  I used a punch balloon for my large pink balloon -- however, do not buy a punch balloon that has ink on it ... like a princess.  That transferred onto my yarn.  *%#)@#! 

IMG_6876


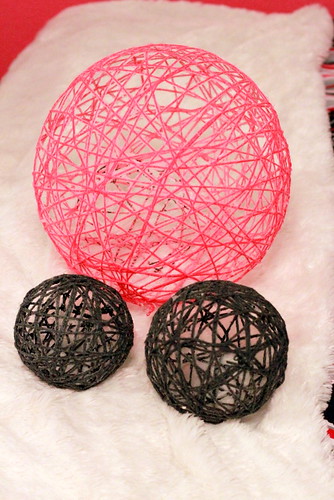
7)  I bought two different types of yarn.  The thicker yarn was cheaper -- and it was harder to deal with and it doesn't look as nice as the thinner yard does (the pink).  So, splurge a bit more and get the thinner yarn.

IMG_6870
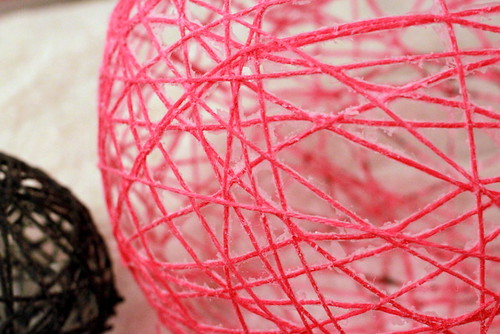
ouch ... sorry for the noise in that picture!  High ISO = noise in my pictures!

8)  When hanging the yarn balls in the ceiling over your daughter's bed, don't drop a tack on her bed.  'Nuf said.  :/

and finally

9)  Are you really sure you want to make these yarn balls??

IMG_6878

My daughter is totally worth it -- but man alive I wish I did something else!  (can you see the black ink in my large pink ball?!! FAIL!)

Tuesday, September 25, 2012

Turning a thrift store picture into a teen approved picture!

Let me get my craft on!!

Katie has a vision of what she wants in her room on the walls.  One wall is going to be covered in pictures shaped like a big heart.   Okay.

The other side will have different kinds of prints w/ cutesy sayings, different colored frames, etc.  Okay.

Let's start with this.... 

I bought this frame at Goodwill for $1.99 (seriously, I never find good frames for this cheap there!).  I removed the back that was wrapped in brown paper bag wrapping.  Took the picture out.

IMG_0233

Took this cute picture I downloaded somewhere online (I'll try to remember where if anyone wants to know!), made a print of it in 8x10, and used scrapbook paper to incorporate some color into it.

IMG_0234
Ta da!

Monday, December 14, 2009

...Merry Kissmas & a Chappy New Year!

**UPDATE!!**  This blog post has been pinned and viewed literally thousands of times -- and unfortunately I have found my pictures floating around w/ people taking credit for this idea -- so I am now replacing the pictures with my blog info.  :)  Hate to have to do this, but if you would like to share this idea on your blog or website, please share my blog link for due credit! 
Some of you have done that, and I Thank you!!  

Every now and then for Christmas I like to give my friends a small gift. One year it was marble magnets. Another year it was a beautiful HUGE mug filled with awesome cocoa mixes & peppermint sticks. One year I made Mike's grandma's homemade hot orange drink mix and placed it in pint sized mason jars. Another year it was an orange, cloves, bottle of vanilla and a recipe for making a delicious simmering pot of home scent.

This year I wanted to do something for my new friends here in Texas... but I was short on time as far as running all over the place gathering stuff to make whatever. My theme this year (and especially this season) is SIMPLIFY!!

But I did find these Yes to Carrots brand of chapstick. According to all the magazines I'm reading lately, this brand is THE brand to have. Apparently. I wouldn't know. I'm not that "hip" with stuff. But, I found them on sale for .99 cents each at Walgreens instead of the usual price tag of $3.79 each. I thought "ooh, Christmas gifts!" Who wouldn't want a nice chapstick instead of chocolate. OK, I can think of one person who would probably rather have a chapstick than chocolate.... :)
With some help from friends, I have a very clever gift.
(at least I think it's clever! LOL)


Dec09027


Dec09026-1


Saturday, August 15, 2009

...mishaps of washer necklaces


I set out last week with the hopes of making the "ever so popular" washer necklaces. I told Mike I wanted the "1/8" set of alphabet steel stamps"... which he said he would get, but he came home w/ something different. It was 3/16", which according to him was only slightly bigger than 1/8". Oh well..... I bought tons of washers, and set out to try my hand at them. I wasn't very good, trust me. It's going to take a LONG time to get used to these, and a LOT of washers! Thank goodness they're so cheap.

I made a double washer necklace (sorry for the lack of a picture), one bigger than the other, of my girls' names. It was pretty cute. I did have trouble rubbing the sharpie ink off with a baby wipe, but I found that using a Magic Eraser helped remove the rest of the ink.
Mike took me on a date that night & kept looking at it and shaking his head. He said "as a mechanic/contractor I can't believe women are finding things to do with WASHERS!" Yep, we're just being frugal, but looking chic!
I offered to make a washer for a church ladies event last Thursday, and He-Who-Shall-Not-Be-Named said "let ME make it... you need more practice". So, he did. He'll never admit he made it, but he did. And he did a good job.... at the very end. He'd get so excited about almost being done, then mess up on the E. Then the T is sideways. Well, take a look for yourself.


::giggling:: I've also been taking scrapbooking paper and gluing them on the washers & placing Diamond Glaze over it, and they've turned out BEAUTIFULLY! Except for the time my girls decided to sprinkle salt on their cucumbers RIGHT BY MY DRYING WASHERS! Augh! The horror! Oh well.... adds to the character, right?

Thursday, May 28, 2009

{just being crafty!}

I found this amazing tutorial (click on that link if you want to learn!) a few months ago on making scrabble tile pendants. I had a few of the supplies, but I had to wait until I found a box of Scrabble at the thrift store! I finally found a box for $1.99! After putting it off for a few days, I went ahead and gave it a shot to see how it would turn out.
I had Diamond Glaze from a previous *cough* attempt at another jewelry craft, and I couldn't figure out how to do it after I put $$ into buying all the supplies. {{does that ever happen to you?!}} But, the newest supply item that I need to find now is the 3D Crystal Lacquer to use instead of Diamond Glaze. I guess that's an online order only. Darn! I had a hard time getting bubbles out of the glaze, but oh well, we've got to start somewhere, right?!
Check out my latest pendants. Need to find some more paper that has little designs on it...
(as well as something not PINK!)
LOVE picnik.com!! Made this picture "POP!"

Sadly, this picture I didn't edit on picnik.com, so it doesn't "pop" as much, but you get the idea that it's a scrabble tile that I used (and one of the letters that we never use! Q!)!

OK, on to my next craft... which was a baby blanket. I like to use a yard of some cutesy material with a yard of flannel. I just flip right side of cutesy fabric facing w/ the flannel, sew, leaving about 4-6 inches (maybe not that much) so I can pull it right side out, then hand stitch (which leaves me groaning b/c I'm not a good hand stitcher!). Then I top it off w/ a zigzag stitch around the edges. Not too bad! I made this for a friend in our ward (or was a part of our ward).


Wednesday, December 31, 2008

{New Way to Calendar}

Earlier this year I was at Kinko's, and they had a huge bin of stuff marked 75% off. Inside it, I found a calendar that you pull off pages for each month (so there were 12 pages total, one for each month). I had a light bulb moment, bought the calendar, and headed home.


If anyone is like me, space is an issue of what I put on my walls (what I have room for!). I have to have the PERFECT calendar before I can add it to my walls!! Then the issue of constantly taking the calendar down each time I write on it (b/c my ink runs dry when I try to write on the calendar while on the wall!), means that the nail will eventually pull out.


So, I came up w/ an idea to put it on my fridge instead of the wall. I just gathered all of my business card magnets (those annoying dental or insurance card magnets you get in the mail?!), and I hot glued them on the back of my calendar. I put enough on to ensure it doesn't fall down (b/c the magnets are SO thin!).


Well, the year of 2008 was coming to an end, and I was worried I wouldn't be able to find a new calendar to carry over my ingenious idea. I took the girls to Target for a few things, and Madison found my calendar!! Yay! However, she wanted the pink calendar, Katie wanted the blue calendar, but I found a black & white calendar that was SO ME!


So, I have my new calendar all ready for next year! The best news? It was on sale this week at Target and was only $4.49!!


Here it is in the shiny new wrap. The brand name is Blue Sky.

See my original magnets? My dad somehow got about a 100 of those Forever Friends magnets... I'm almost out!! I've been using them on crafts!

Can you tell the middle magnet is from a dentist? (the shape is a floss canister!)

The final outcome!! Just pull off each page at the end of each month!

Wednesday, December 17, 2008

{Homemade Brown Sugar Scrub}

I had been racking my brain for something as a teacher gift. Last year I put together a popcorn gift set w/ theatre candy & popcorn with a Blockbuster gift card. I didn't want to do it this year. Instead, I used my special canning jars that I found on clearance at Target earlier and made homemade brown sugar scrubs.


Here is the recipe I found online.


Brown Sugar Scrub


1 cup brown sugar
1/2 c sweet almond oil
1 tsp Vitamin E oil
1 tsp vanilla

Mix together and place in a jar!


Now, I found out that I could've used olive oil instead, or even canola oil, but the almond oil has many benefits for your skin. It was also pretty pricey as well. I looked in the cooking aisle, and found it on sale for $7.58 for 8 1/2 oz. Then I went to the health food part of our store (it's a huge awesome store) and found almond oil MUCH cheaper in that section. I bought a 16 oz bottle for $9.29, and it's also food grade too, so you can cook with it as well. When you add the Vitamin E oil, it softens the skin, and the vanilla just adds a pleasant smell to it (unless it makes you want to eat your arm!).


To give you an idea of how much it makes, I made two batches of this, and it made 3 of the small canning jars full. I'll complete with cute tags on the side w/ colorful ribbon later today! Enjoy!

Tuesday, September 23, 2008

{Creating Clippies}


I had been wanting to make these ribbon covered clippies for a long time, but just kept forgetting about them. I went to Target to find a present for Presley's birthday, and in the baby section, there was a package of ribbon covered clippes for (get this...) $9.99!!! There were only four of them in the package!! I saw that, and decided "well, now's a good time to try to figure out how to do these things".


I bought a small package of the clippies, but later found out that Sally's has them for about 100 in a package for $5.36. I had bought them 12 in a package for $2.99 at Target (so don't do that route). I had hot glue at home, some ribbon (you have to use the 3/8" ribbon). I did buy some of those grip stuff that you use to lay down on your cabinets. I'm still waiting to hear from Marcie to see if they actually help the clippies stay in the hair. I just glued a small section of that on the top part of the clippies.


As soon as I make it to Hobby Lobby to buy some more ribbon, the girls want to try it out in their hair. I tried to find smaller clippies as I was thinking they may be too big for Presley's hair, but I couldn't find anything smaller than what I found.
Related Posts with Thumbnails